Moving data with Wizaplace ETL on Laravel
In this article we will delve on how to use Wizaplace PHP-ETL which is a library for Laravel that helps us processing data from different sources through a process known as ETL.
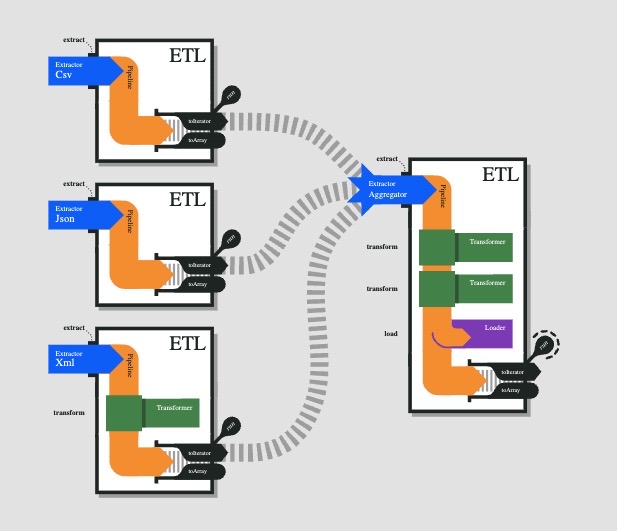
To do this we have different functions for each of the stages within the process managed by an ETL class, that acts as the backbone of the entire process, and although we can do many things with this library in this post we will just go throw the basics concepts so at the end of it you will be able to integrate it to your project and in a next post we will analyze which are the more important problematics you can encounter while applying an ETL process and how to overcome them.
What is an ETL
It’s a process used in data integration and data warehousing. It involves extracting data from various sources, transforming it into a suitable format and loading it into a target destination system. We can divide it into three stages:
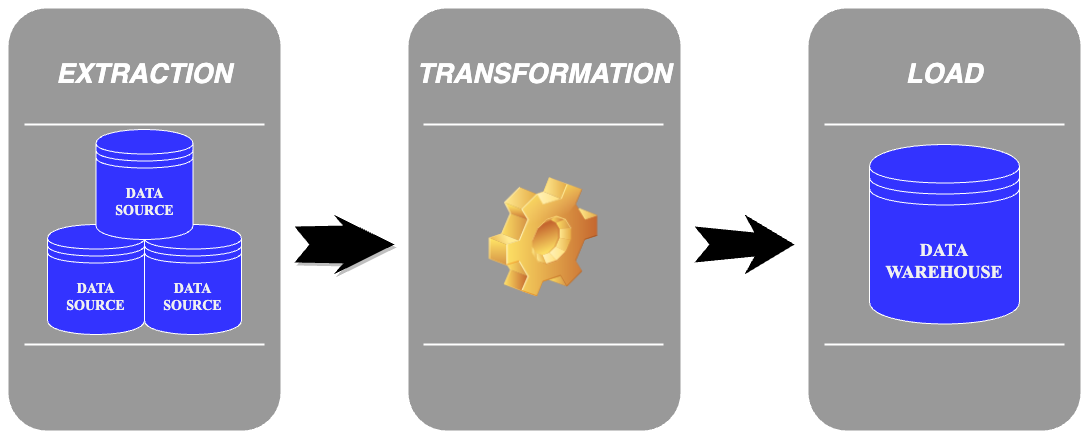
- Extraction: data is collected from multiple sources.
- Transformation: Once the data has been extracted, the transformation is carried out to ensure its quality and adaptation to the needs of the destination system. This includes data cleaning and validation, business rule enforcement, normalization, aggregation and the combination of different sources, among other operations.
- Load: the transformed data is loaded into the target system typically a data warehouse, a reporting database or a business intelligence tool. Uploading can involve creating new tables, updating existing records, or generating reports.
Advantages of using an ETL
The importance of the ETL process lies in its ability to ensure the integrity and quality of the data used in business systems. But why should i use an ETL process instead of the other alternatives you will ask, well we can highlight several reasons why, here you have some:
- Data Integration: it provides a structured approach to gather data from different systems and consolidate it into a unified format.
- Data Transformation: It allows you to clean, filter, aggregate, validate, and enrich data as needed to meet the requirements of your destination system or analysis of.
- Data Quality: You can identify and correct errors, remove duplicates, handle missing values, and standardize data formats, which leads to reliable and accurate data for decision-making.
- Automation and Efficiency: This saves time and effort compared to manual data manipulation, especially when dealing with large volumes of data or frequent data updates.
- Scalability and Performance: It can handle large datasets efficiently. By optimizing the data flow and employing parallel processing techniques.
- System Integration: It allows integration between different systems, such as CRM, ERP, marketing automation, or any other application that requires synchronized and updated data. It helps to bridge the gap between disparate systems and ensures seamless data flow.
SETUP
Install from your terminal using composer
composer require wizaplace/php-etlThis library doesn’t specify a folder structure in your Laravel project. For this scenario, I will show you a recommended way to implement a folder structure in Laravel that worked very well for me.
./
 |-- src/
 |   |-- App/
 |   |    |-- Console/
 |   |        |-- Commands/
 |   |            |-- Etl/
 |   |                |-- RunClientsPipeline.php
 |   |    |-- Etl/
 |   |        |-- Source/
 |   |            |-- Config.php
 |   |            |-- Clients/
 |   |            	|-- Pipeline.php
 |   |        |-- Destiny/
 |   |            |-- Config.php
 |
/.
First thing we will need is a config file (for each database) that contains all the information necessary to make the connection. For the case of MySQL the structure will be:
namespace App\Etl\Source;

final class Config
{
    /**
     * This is the config of the source database
     * @return array
     */
    public static function getDatabaseConfig()
    {
        return [
            'driver'    => 'mysql',
            'host'      => 'localhost',
            'port'      => '3306',
            'database'  => 'database',
            'username'  => 'user',
            'password'  => 'password',
            'charset'   => 'utf8',
            'collation' => 'utf8_unicode_ci',
        ];
    }
}
You will need to create also the config file for the destiny database.
namespace App\Etl\Destiny;

final class Config
{
    /**
     * This is the config of the Destiny database
     * @return array
     */
    public static function getDatabaseConfig()
    {
        return [
            'driver'    => 'mysql',
            'host'      => 'localhost',
            'port'      => '3306',
            'database'  => 'database',
            'username'  => 'user',
            'password'  => 'password',
            'charset'   => 'utf8',
            'collation' => 'utf8_unicode_ci',
        ];
    }
}
For a different database driver consult the official documentation.
In a separate file we will have concentrated the entire ETL process. We will know this file as a pipeline and we will have to create one for each ETL process that we want to carry out to keep the code clean, also it will be useful in the final stages to be able to control the order in which these pipelines are to be executed and thus avoid inconsistency in the results.
Based on the following example table we are going to update the status column of the clients. In our old database the status is a numeric value 1 or 0 to represent if the client is active or inactive. In our new table we will represent this with the strings Active and Inactive respectively. This is a pretty simple scenario but it will help us to go throw the basics.
Table 1: “clients“
+----+------------+-----------+--------+
| ID | name       | address   | status |
+----+------------+-----------+--------+
| 1  | John Perez | Street A  |    1   |
| 2  | Ana Lopez  | Street B  |    1   |
| 3  | Pedro Gomez| Street C  |    0   |
+----+------------+-----------+--------+
The standard structure to follow in this pipeline file will be:
Extractor -> Transformer/MyCustomTransformer -> SqlLoader
Some of the components that will be used on the pipeline in our scenario are:
namespace App\Etl\Source\Client;

use Wizaplace\Etl\Etl;
use App\Etl\Source\Config as SourceConfig;
use App\Etl\Destiny\Config as DestinyConfig;
use Wizaplace\Etl\Database\ConnectionFactory;
use Wizaplace\Etl\Database\Manager;
use Wizaplace\Etl\Extractors\Table;
use Wizaplace\Etl\Loaders\InsertUpdate;
use Wizaplace\Etl\Row;
use Wizaplace\Etl\Transformers\Callback;
The ETL class is the most important part and will drive the whole process. Within this class we have the three components that correspond to the structure before mentioned the extractor, the transformer and the loader.
But first we will initialize is the component that allows us to access the database
$dbManager = new Manager(new ConnectionFactory());This is where we create the particular access to each database, you can use the same Manager already defined to access the different databases since they are identified by a unique name.
$dbManager->addConnection(SourceConfig::getDatabaseConfig(), 'db1');
$dbManager->addConnection(DestinyConfig::getDatabaseConfig(), 'db2');
Extraction
As we already highlighted the ETL class that will manage the entire process. We proceed to create a component of these classes and extract the information with which we are going to work. The extractor receives three arguments: the type of source from which the data is retrieved, the source (in this case the table) and optional arguments (in this case you must indicate the database from which it will be obtained).
$clientsETL = (new Etl())
    ->extract(new Table($dbManager), 'clients', [
        Table::CONNECTION => 'db1',
    ]);
Transformation
Now that we have all the data we need, we will begin to update the information of each client record. For that, we are going to access the column of status of each row as follows:
$clientsETL->transform(new Callback(), [
        Callback::COLUMNS  => [
            'status',
        ],
        Callback::CALLBACK => function (Row $row, $column){
            $clientStatus = $row->get($column);
            if ($clientStatus === 1) {
                return ’Active’;
            }
            return ‘Inactive’;
        },
]);
During the transformation process you can do things like discard rows that do not meet certain conditions, renaming columns, encoding information among other things that the library offers us. The transformers receive two arguments: the first is the type we will use the Callback and the optional parameters, in our example are the column name and value of the different columns.
Load
And so we come to the last step, which is loading the data that is currently in our component $clientsETL. This load can be done on the same table from which it was extracted, which will cause an update of the values that are sent to the loader, or it can be loaded on a new table, we will do the first one.
$clientsETL
    ->load(new InsertUpdate($dbManager), 'new_clients', [
        InsertUpdate::CONNECTION => 'db2',
        InsertUpdate::KEY        => [
             'ID',
        ],
        InsertUpdate::TIMESTAMPS => false,
        InsertUpdate::COLUMNS    => [
             'ID'      => 'ID',
             'name'    => 'name',
             'address' => 'address',
             'status'  => 'status'
        ],
    ]);
To map columns from the ETL process to the database table we use an associative array where the key is the name of the process column and the value is the table column. It isn’t required to send all the columns if what we are doing is an update of existing rows. But if we are inserting new rows it’s required to send all those fields that can’t be null to avoid sql errors during the insertion.
How do we run our ETL
Now we have the complete ETL that will be run with all the required steps. To run an ETL process, you can chain the steps methods in the desired execution order and then call the run method.
$etl->extract(/* ... */)
    ->transform(/* ... */)
    ->load(/* ... */)
    ->run();
Or instantiate it from another file and call it using the Symfony Command this makes it easier to perform various ETL from the command line, allow us to handle errors on the execution, display logs or simply take advantage of the fact that we have a complete ETL on a single file.
use App\Etl\Source\Client\Pipeline;

class RunClientsPipeline extends Command
{
    /**
     * The name and signature of the console command.
     *
     * @var string
     */
    protected $signature = 'etl:clients:run';

   /**
     * The console command description.
     *
     * @var string
     */
    protected $description = 'Run Clients ETL pipeline';

    /**
     * Create a new command instance.
     *
     * @return void
     */
    public function __construct()
    {
        parent::__construct();
    }

    /**
     * Execute the console command.
     *
     * @return int
     */
    public function handle()
    {
        $this->info('Running pipeline');
        try {
            $pipeline = new Pipeline();
            $pipeline->run();
            $this->info('Pipeline finished');
        } catch (Exception $e) {
            $this->error('An error occurred while trying to run Client ETL pipeline: ' . $e->getMessage());
            return Command::FAILURE;
        }
        return Command::SUCCESS;
    }
}
If the process is executed successfully we will end up with the following table on the destiny database and the messages Running pipeline/Pipeline finished on your terminal.
Table 2: “new_clients“
+----+------------+-----------+-----------------+
| ID | name       | address   |     status      |
+----+------------+-----------+-----------------+
| 1  | John Perez | Street A  |     Active      |
| 2  | Ana Lopez  | Street B  |     Active      |
| 3  | Pedro Gomez| Street C  |    No active    |
+----+------------+-----------+-----------------+
With the concepts analyzed in this post we have the bases to apply an ETL in your Laravel project. In a future post we will delve into some of the issues we can encounter when applying ETL (source data structure change, fault tolerance, data quality, volume and ETL performance) and how to deal with them using Wizaplace with Laravel.