Master-Slave Replication in MySQL
Master-Slave replication is one of the easiest replication techniques, however, is very helpful for several things. For us is important to allow a horizontal scale-up of the database (one for write, several for reading operations) and to create analytics databases to run big and slow queries without locking the sites.
How it works
This image clarifies how this thing works pretty well
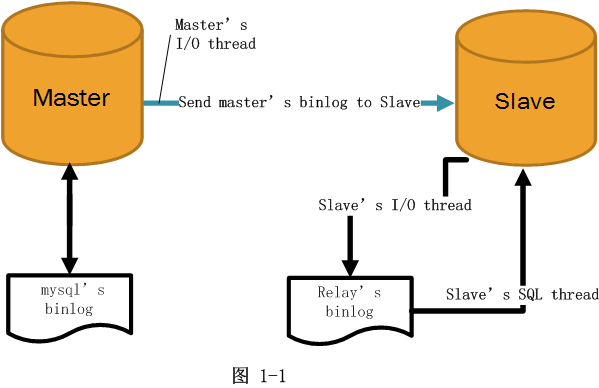
In the simplest schema, there is a Master database and one Slave (it can be more). The Master database is the one that receives all the inserts, updates, deletes, and other data modification transactions.
All the transactions are stored by a process that runs in the Master server into several files called the bing logs (usually stored into /var/log/mysq/mysql-bin.xxxxxxx). This is a log with all the transactions executed in the master that will be needed in the Slave to replay to them and update the slave database.
The Slave database has a Slave process that asks the Master for updates on his bin log. The Master sends the logs to the salve. The Slave receives these logs and saves them into the relay bin log and replay the instructions on the salve database.
The bing log has entries for each transaction executed, every one of this entries has an ID that represents the position in the bin log. The Slave keeps track all the time of the last executed position in the log to know which will be the next transaction to be executed. This is very important to know because when there is an issue we need to identify the last transaction executed in the Slave relay’s binlog and which is the current position of execution on mater’s binLogto to know how far behind is the Slave from the Master.
How to setup a Replication
Let’s assume that we have two database servers, db01 and db02, db01 is the master and db02 is the Slave.
Master Setup
In order to setup the Replication we need to setup some files.
On the Master edit /etc/mysql/my.cnf
Change the bind-address to listen on the network.
bind-address = YOUR.IP.ADDRESS
The next configuration change refers to the server-id, located in the [mysqld] section. You can choose any number for this value (it may just be easier to start with 1), but the number must be unique and cannot match any other server-id in your replication group. I’m going to go ahead and call this one 1.
Make sure this line is uncommented.
server-id = 1
Move on to the log_bin line. This is where the real details of the replication are kept. The Slave is going to copy all of the changes that are registered in the binlog. For this step we simply need to uncomment the line that refers to log_bin:
log_bin = /var/log/mysql/mysql-bin.log
Finally, we need to designate the database that will be replicated on the Slave server. You can include more than one database by repeating this line for all of the databases you will need.
binlog_do_db = YOURDATABASE
After you make all of the changes, go ahead and save and exit out of the configuration file and restart the mysql server, The next steps will take place in the MySQL shell itself.
Open up the MySQL shell.
# mysql -u root -p
We need to grant privileges to the Slave. You can use this line to name your slave and setup their password. The command should be in this format:
> GRANT REPLICATION SLAVE ON *.* TO 'slave_user'@'%'
     IDENTIFIED BY '***';
> FLUSH PRIVILEGES;
Next, select your database.
> USE YOURDATABASE;
Following that, lock the database to prevent any new changes.
IMPORTANT!, this command locks the database and nobody will be able to read/write, your system will be offline for the time that the DB is locked, so don’t forget to run UNLOCK TABLES explained later.
> FLUSH TABLES WITH READ LOCK;
Now lets reset the Master logs to start with a fresh binlog and to generate a dump from there and we will use that dump to initialize the salve DB;
> RESET MASTER;
Then, exit from the mysql shell and in the command line create a database dump from the Master.
# mysqldump -u root -p YOURDATABASE > db-dump.sql
Now, returning to the mysql shell, run unlock the databases (making them writable again). Finish up by exiting the shell.
> UNLOCK TABLES;
Now we are ready to setup the slave.
Slave Setup
Log into your slave server, open up the MySQL shell and create the new database that you will be replicating from the Master (then exit):
> CREATE DATABASE YOURDATABASE;
Import the database that you previously exported from the Master database.
# mysql -u root -p YOURDATABASE < /path/to/db-dump.sql
Now we need to configure the Slave configuration in the same way as we did the Master, go to edit /etc/mysql/my.cnf.
We have to make sure that we have a few things setup in this configuration. The first is the serverid. This number, as mentioned before needs to be unique. Since it is set on the default (still 1), be sure to change it’s something different.
Server-id = 2
Following that, make sure that you have the following three criteria appropriately filled out:
relay-log = /var/log/mysql/mysql-relay-bin.log
log_bin = /var/log/mysql/mysql-bin.log
binlog_do_db = YOURDATABASE
You will need to add in the relay-log line: if it is not thereby defaulted.
Once you have made all of the necessary changes, save and exit out of the Slave configuration file and restart MySQL.
The next step is to enable the replication from within the MySQL shell. Open up the MySQL shell once again and type in the following details, replacing the values to match your information:
> CHANGE MASTER TO MASTER_HOST='YOUR.MASTER.IP',
    MASTER_USER='slave_user',
    MASTER_PASSWORD='***',
    MASTER_LOG_FILE='mysql-bin.000001',
    MASTER_LOG_POS= 1;
This command accomplishes several things at the same time:
- It designates the current server as the Slave of our Master server.
- It provides the server the correct login credentials
- Last of all, it lets the Slave server know where to start replicating from; the Master log file and log position that since we started with a RESET MASTER will be 1, however on other cases we might need to set to a different position.
Activate the Slave server: START SLAVE;
With that, you have configured a Master and Slave server.
You are able to see the details of the Slave replication by typing in this command. The \G rearranges the text to make it more readable.
> SHOW SLAVE STATUS\G
If there is an issue in connecting, you can try starting the Slave with a command to skip over it:
> SLAVE STOP;
SET GLOBAL SQL_SLAVE_SKIP_COUNTER = 1;
> SLAVE START;
However, if you have problems it might become complicated to solve, that is material to another post I guess.
Total Disaster, you need to recreate the Slave from scratch with the Master running
If you missed up badly and you need to restart the salve and your system is online you need to follow these steps.
First, Stop the Slave process, in the salve server, into the mysql shell, run
> STOP SLAVE;
Now, go to the Master. We will need to lock the database, RESET the bin logs, generate a backup from the Master, UNLOCK the tables.
> RESET MASTER;
> USE YOURDATABASE;
> FLUSH TABLES WITH READ LOCK;
Go to the shell
$ mysqldump -u root -p YOURDATABASE > mydb-dump.sql
Go back to mysql shell
> UNLOCK TABLES;
Now go to the Salve and upload to that server the dump
# mysql -u root -p YOURDATABASE < mydb-dump.sql
# mysql YOURDATABASE

> CHANGE MASTER TO MASTER_LOG_FILE='mysql-bin.000001',
    MASTER_LOG_POS=1;
Then start the Slave
> START SLAVE;
Check the status and see of all works OK
Commands Reference
Here some references to the commands that you’ll use
START MASTER: Runs in the Master server, starts the replication Master process.
STOP MASTER: Runs in the Master server, stop the Master process.
STOP SLAVE: Runs in the Slave, stop the Slave process.
START SLAVE, same as above but starts the Slave process.
CHANGE MASTER: This command runs in the salve, is useful to set the bin log and the position in the salve. Needs to be used with SHOW MASTER STATUS in the server to get the FILE and the POSITION.
Example how to use it
CHANGE MASTER TO MASTER_LOG_FILE=’mysql-bin.000001′, MASTER_LOG_POS=1;
SHOW MASTER STATUS: Runs in the server, gets the bing log information for the server.
FLUSH TABLES WITH READ LOCK: Gets a global read lock of the database, use it carefully since will cause an outage of your system since the DB is locked. Use UNLOCK TABLE to release the locks. Will be needed to generate a snapshot of the DB sync with the bin logs.
UNLOCK TABLE: release the global read lock.
RESET MASTER: Runs in Master, RESET the bin log, Use it carefully, don’t run it without knowing that you want to RESET your binary logs to restart all the sync between the Master and the salve.
RESET SLAVE: Runs in the Slave, Reset the relay logs in the SLAVE, Use it carefully, it can break the Slave if you don’t know what it does.