How to implement custom Drush commands on Drupal 9
For non Drupalers, Drush is the subsystem of Drupal that provides a CLI interface to interact with your Drupal site. In other words, it provides shell commands to run task on Drupal, such as enable/disable modules, run updates, import/export config, dump/import the database, open a database console cli and many many more. If you know WordPress you can compare it with wp-cli, or in Laravel with artisan.
When you are developing an application you’ll need at some point to have some kind of tools to manage, debug and administer your site very easy, and if you are a shell user, Drush is your best partner.
Drush is basically a meta command, a command that invokes others commands. Out of the box we have tons of commands for the common task, some contrib modules add more commands for the specific module task. Besides that, Drush provides an amazing mechanism to extend it and implement your custom commands for your needs.
In this post we will see how to implement commands in Drush 9 and above, on previous versions the implementation is totally different.
Drush 9 has been implemented using the Symfony Console component, this allows Drush to reuse many other components from the PHP ecosystem, such as the AnnotatedCommand. This provides a working interface to initialize a Command using Annotations. Drush 9 uses Annotations to implement a command.
In order to implement a Drush command you need a module where you will define a service and implement the service class. I won’t explain how to create a Drupal module, however if you don’t know how to do it take a look into this.
Defining a Service
In your module .service.yml add an entry for your Drush service class.
Note: Replace your_module by your module name
In the file your_module.services.yml, add this entry to bind your service class to the injection dependency container.
  your_module.commands:
    class: \Drupal\your_module\Commands\YourModuleCommands
    tags:
      - { name: drush.command }
Implement the Class Service
The next step is to create a class with the name YourModuleCommands.php, in the <your_module_path>/src/Commands directory, that’s is because that is the path we have defined in the class entry of the services definition.
The content of this class must be like this
<?php

namespace Drupal\your_module\Commands;

use Drush\Commands\DrushCommands;

class YourModuleCommands extends DrushCommands {

    // Commands will go here as methods.

}
As you can see, the class has the right namespace for the correct autoloading.
It uses the DrushCommand class to be extended in our implementation.
The class name is the same as the file name, without the extension (again autoloading proposes), and in the body of the class we will add methods that will be the commands implementations.
Let’s implement our first annotated method. We will implement a command called your_module:meaning, this command will print an output in the screen. The method will look like this
   /**
    * The answer to universe, life and anything else
    *
    * @command your_module:meaning
    *
    * @aliases ymm
    *
    * @usage your_module:meaning
    *
    */
    public function meaningOfLife() {
        return '42!';
    }
As you can see, we have a big comment on the method. All the @ lines are the annotations. Here we are using
@command : Defines the command name, prefix and name, if we don’t have this annotation, the function is not a command for Drush. You need to add this annotation on each function of the class that expose a Drush command.
@aliases: Defines an alias for the command, usually a shorter name
@usage: Demonstrates how the command should be used.
To test if this work
- be sure that your module is enabled
- clear the cache
Run in your terminal the Drush command, alone, you’ll see the list of available commands, you must be able to see your custom command in the list
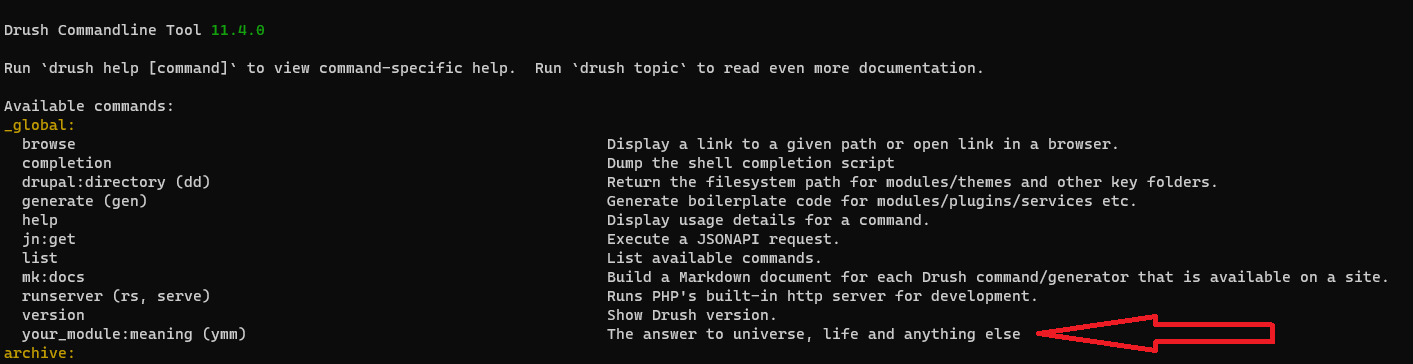
Now you can run the command
drush your_module:meaning
or, using the alias
drush ymm
If everything went well, you’ll see the 42! on your screen.
So far you have your first command and you can see the mechanics of how to implement commands. Now, lets go further.
Output
If you are implementing a command you’ll want to see some data, from any kind. Drush provides several alternatives to output data, the most basic is to return from the command a string or an array of strings.
The return value will be rendered in the screen, and serialized if is an array. In the example we have returned an string.
In the case of an array will look something like this
    /**
    * The answer to universe, life and anything else as array
    *
    * @command your_module:meaning_arr
    *
    * @aliases ymma
    *
    * @usage your_module:meaning_arr
    *
    */
    public function meaningOfLifeArr() {
        return [
            ['42!'],
            ['Yes', 'thats is correct', 'is 42!']
        ];
    }
The output of that command will look like this

As you can see, is an array of arrays, each array is rendered in a single line and the values of each array are strings combined by tabs.
It can be an array of strings as well, all will be printed in a single line.
As you can imagine, this can be used in some scenarios where we will have a single output or if we combine the output in a single variable and we want to print all at the end of the execution.
$this->output()
Each command has a io property, this property provides a way to get inputs and generate outputs. Lets see how to use the output().
In order to use output, inside of the command method, you can use the reference $this to call to the member method output() that will return an object instance of \Symfony\Component\Console\Output\OutputInterface, this interface has several methods, but the most important for us now are writeln and write.
Writeln prints whatever you send as parameters and adds a carry return at the end, writes a line.
Write, prints whatever you send as parameters and left the print position at the end of the printed string.
So here you have an example about this methods.
/**
* Output Samples
*
* @command your_module:output
*
* @aliases ymo
*
* @usage your_module:output
*
*/
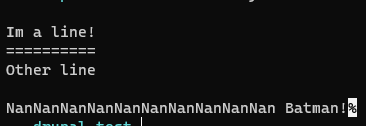
public function outputs() {
$this->output()->writeln('Im a line!');
$this->output()->writeln('==========');
$this->output()->writeln('Other line');
$this->output()->writeln('');
for($i = 0; $i < 10; $i++) {
$this->output()->write('Nan');
}
$this->output()->write(' Batman!');
}
The output will looks like this
So far so good, you can use this methods as your needs, however, in the Drush documentation we can read this
The Output object is rarely needed. Instead, return an object that gets formatted via the Output Formatter system.
We will see later how to use the Output formatters, that is a more elegant way to print the outputs, however, we are not saying do not use this alternative, you can use it if you think it will work for your need.
Better Outputs
Using the IO attribute, we can show some better output using some default functions that Drush has via the Symfony Console Style features. We have methods like success, error, alarm and note and more, take a look to the example and the output, it is self descriptive.
    /**
    * Fancy Outputs Sample
    *
    * @command your_module:fancy_outputs
    *
    * @aliases ymfo
    *
    * @usage your_module:fancy_outputs
    *
    */
    public function fancy_outputs() {
        $this->io()->success('All good :)');
        $this->io()->error('All bad :(');
        $this->io()->warning('Alarm !!!!!!');
        $this->io()->note("I'm a note");

        $this->io()->comment('Comments are nice');
        $this->io()->info('Information');
        $this->io()->caution('It might be dragons there');

        $this->io()->table(
            [
                'ID', 'Name'
            ],
            [
                ['1', 'Frodo'],
                ['2', 'Merry'],
                ['3', 'Pippin'],
                ['4', 'Gandalf'],
            ]
        );

        $this->io()->progressStart(10);
        for ($i = 0; $i < 10; $i++) {
            $this->io()->progressAdvance();
            sleep(1);
        }
        $this->io()->progressFinish();
    }

Inputs
As any system, we need inputs for our process to generate an output, lets see how to input data to our commands.
Drush, as a any cli command, has 3 alternatives
- Parameters, the command arguments, these are set at the moment of calling the command and are the same for all the execution.
- Options, flags for our command, these are set at the moment of calling the command and are the same for all the execution.
- Interactive inputs, these are introduced by the user over the command execution, works like a prompt interaction and we have a few alternatives for use it.
Parameters
Parameters are declared on the annotations using @param, related with that in the command implementation (the function) we need to define a function argument with the same name of the parameter.
   /**
    * Param Sample
    *
    * @command your_module:param
    *
    * @param $mandatory This is a mandatory parameter
    * @param $default This param has a default value, is not mandatory
    *
    * @aliases ymp
    *
    * @usage your_module:param
    *
    */
    public function params(
        string $mandatory,
        string $default = 'World')
    {
        $this->output()->writeln("$mandatory $default!");
    }
In the example we can see that our param commands takes to params, $mandatory that represents a mandatory parameter that must be defined always. $default that is a default parameter, it might be or not set when the command is executed, if not, the default value will be used and that is set in the function interface definition (in this case World). The name of the params is totally representative, you can use the param name that you want.
You can see the annotation using @param in the comments, where the function argument and the command param are bind. It must be the same name in the two places.
If we ask for help of the command we can see this info by default
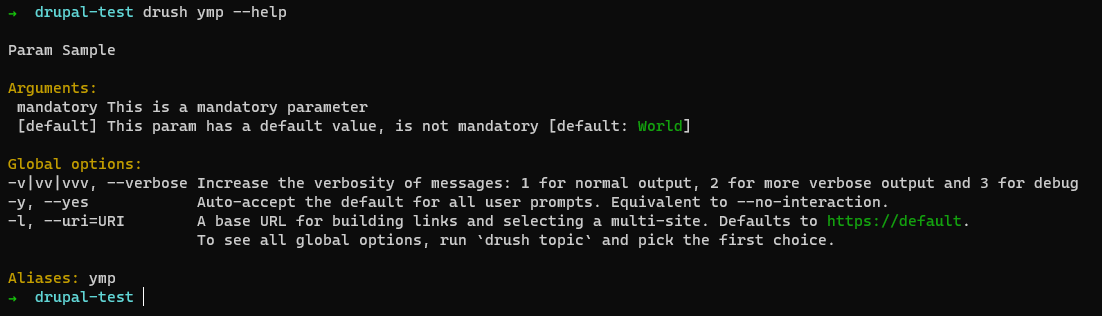
This information is generated by Drush by default reading the annotations, awesome right?
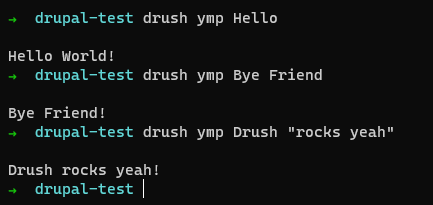
To run a command with params you just need to write the command name and the value of the first param, space, the value of the second param, and continue for all the params of your command. Is very important the order to the parameters.
An example of the invocation and the output for this command is
Options
Options are more often knows as command flags, the ones that we set using –uri=foo for example.
Options are no mandatory arguments for the command, you can invoke the command and not set any options, however, all options needs to have a default value.
In order to declare options, we need first to add the @options annotation, for each option, you need to add an entry with the option name.
Second, you need to create as last item of the function interface, a function argument called $options that is an array and by default we will set an array with all the possible options and their default value.
   /**
    * Options Sample
    *
    * @command your_module:opt
    *
    * @param $op1 Param number 1
    * @param $op2 Param number 2
    *
    * @options opt1 first option
    * @options opt2 second option
    *
    * @aliases ymopt
    *
    * @usage your_module:opt
    *
    */
    public function calc(string $op1, string $op2,
        array $options = [
          'opt1' => 'a',
          'opt2' => 'b'
        ])
    {
        $this->output()->writeln("{$options['opt1']}");
        $this->output()->writeln("{$options['opt2']}");

    }
As you can see, this command has two parameters, both mandatory and then options.
This command defines two options, opt1 and opt2, by default will take a and b as value.
Finally the command will print the options value.
Lets see how the help looks for this command.
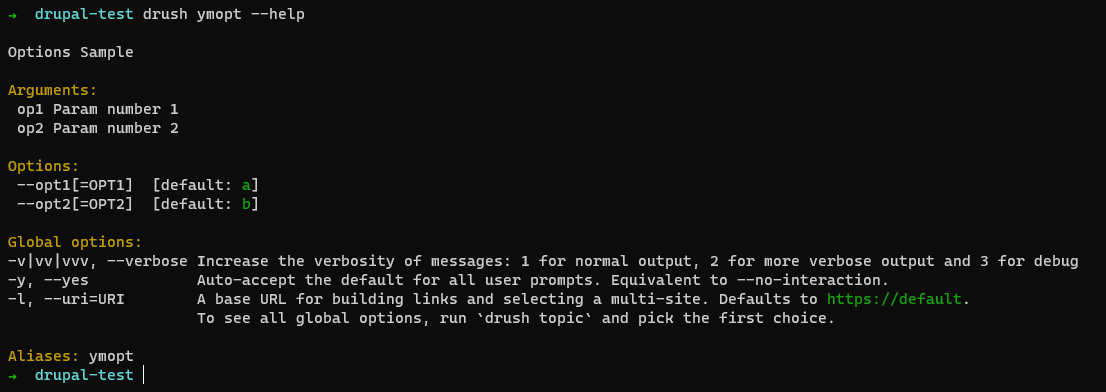
Pretty clear. So, this is how we can invoke this command.
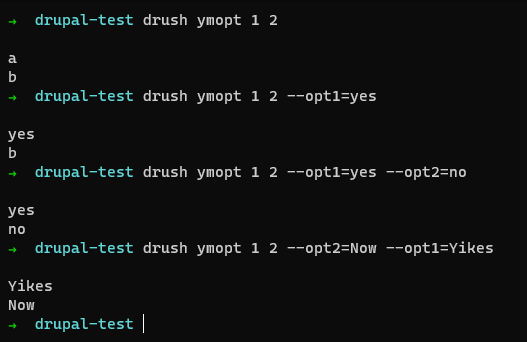
In the first case, we invoke the commands with no options.
In the second case, we only set the opt1, opt2 takes the default value.
In the last case, we can see that the order of the options does not matters, since the options are named.
Which one shall I use? Options or parameters?
It depends, if you need the user to always set a value for the input, it must be a parameter.
If you can have a default value, we can use a parameter or an option as well.
If you input is optional, can take a default value, and is mostly related with how the command will behave, it more accurate to use an option.
The important thing is that there is no a wrong way, and you can use both in combination.
Interactive Input
Once again, the io attribute allow us to make interactive questions on our command, these are prompt like stops that wait for some user input and continue with the value entered for the users. We have
- ask : Makes a questions to an user and whatever he type, is returned as a string.
- askHidden: Makes a questions to an user and whatever he type, is returned as a string. Whatever the user types is not printed in the screen.
- choice: Shows options to the user, the user selects an option and the selected value is returned.
- confirm: Ask for confirmation to the user, yes it will continue, no, the command will stop.
/**
* Interactive Sample
*
* @command your_module:interactive
*
* @aliases ymi
*
* @usage your_module:interactive
*
*/
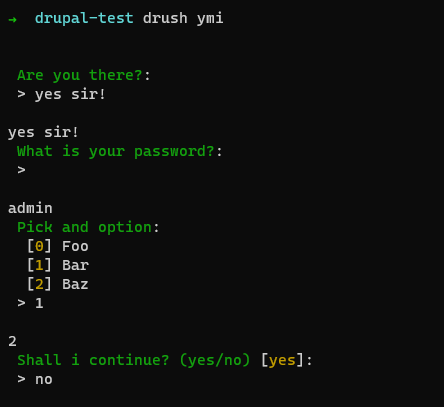
public function interactive() {
$val = $this->io()->ask('Are you there?');
$this->output()->writeln($val);
$val = $this->io()->askHidden('What is your password?');
$this->output()->writeln($val);
$val = $this->io()->choice('Pick and option',
[
'1' => 'Foo',
'2' => 'Bar',
'3' => 'Baz',
]
);
$this->output()->writeln($val);
$val = $this->io()->confirm('Shall i continue?');
$this->output()->writeln($val);
}
The output will look like this
Output Formatters
From Drush documentation
Drush utilizes a powerful formatting and filtering system that provides the user with a lot of control over how output from various commands is rendered.
- Output formats may be used to select the data type used to print the output. For example, many commands allow the user to select between a human-readable table, or various machine-parsable formats such as yaml and json.
- Output fields may be used to select and order the data columns.
- Output filters may be used to limit which data rows are printed based on logical expressions.
What does this mean? If you are a power drush user, you probably saw that by default in some command we have this options
- –filters applies filter to the data
- –format defines the output format, such as csv,json,xml,table
- –fields defines which files wants to show
For example, the default command pm:list that show the current modules, by default shows this
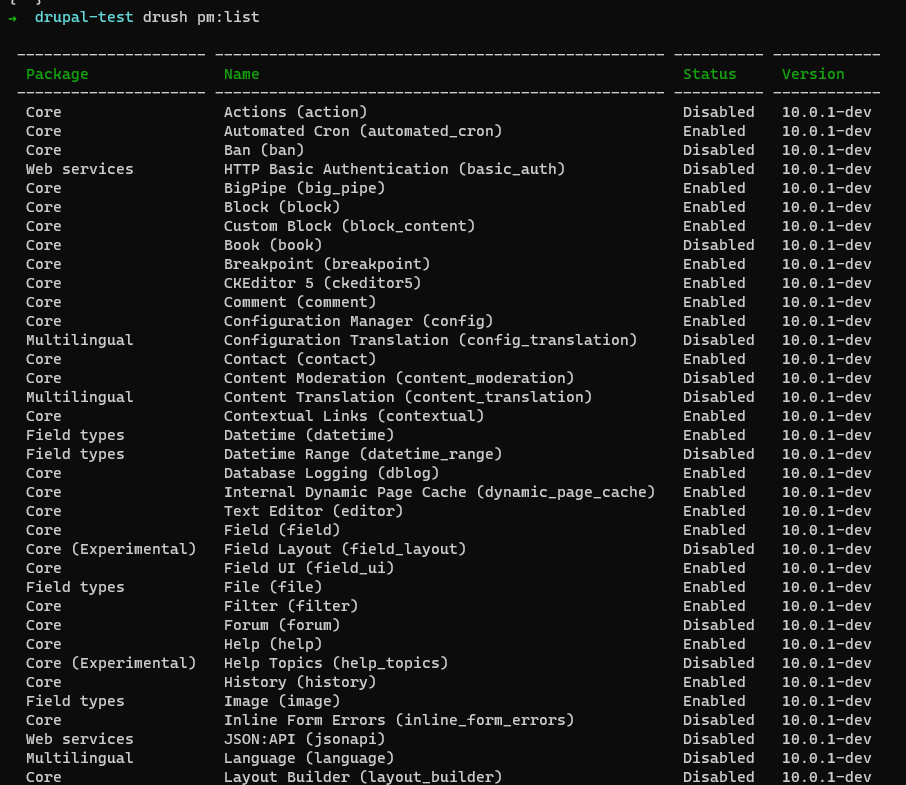
However, using these options we can see something like this
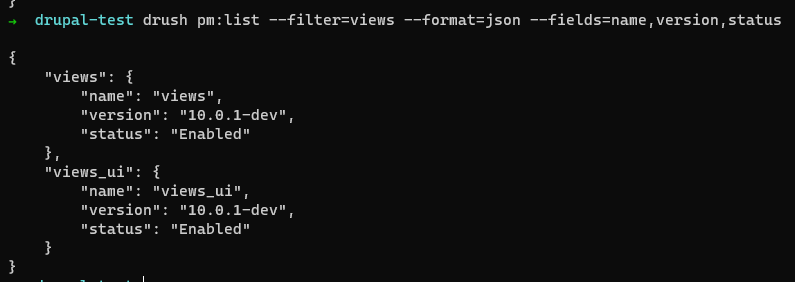
Amazing again right!, this can be super useful to write commands that will be piped to other commands, export data to files and many others interactions.
In order to provide our command of this feature, we need to return an object that allows Output Formatters transformations. These objects are available via the package Output Formatters.
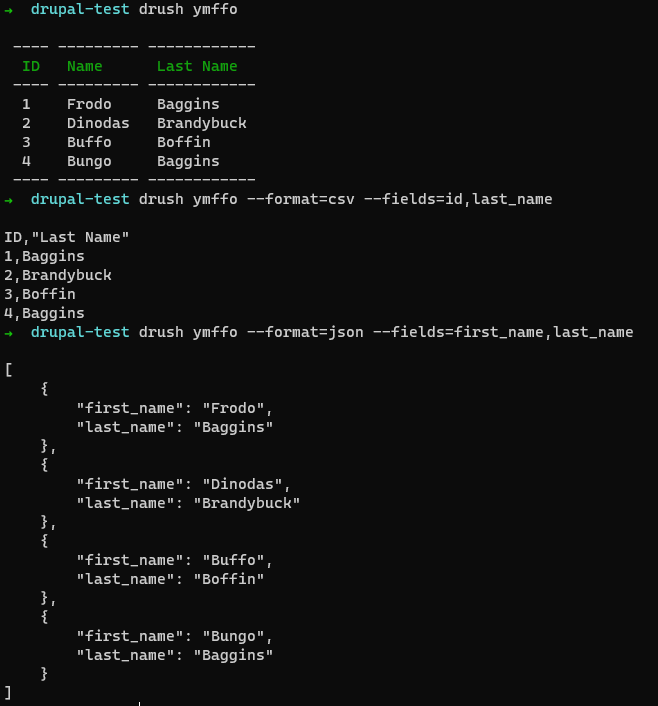
I’ll show only one type, the RowsOfFields type, since is the one that I more use and understand.
Again, to use this formatter, we have a combination of annotations and code.
Lets analyze this command.
We have the annotation @fields-labels, this is used to define for each property in the array the label.
We have the @default-fields, this is used to define the default fields metadata, which fields and in which order will be shown. This can be altered using the –fields options.
Finally, we need to define that the return value is of the type RowsOfFields.
In the code side, we need to create an instance of RowsOfFields, that will accept an array as an argument, and this array must have, for all entries in the the array, an array with the fields defined in the annotations.
    /**
     * Output Formatted
     *
     * @command your_module:fo
     * @aliases ymffo
     * @usage your_module:fo
     *
     * @field-labels
     *   id: ID
     *   first_name: Name
     *   last_name: Last Name
     *
     * @default-fields id,first_name,last_name
     *
     * @return \Consolidation\OutputFormatters\StructuredData\RowsOfFields
     *
     */
    public function formatted_output() {
        $table = [];

        $table[] = [
            'id' => 1,
            'first_name' => 'Frodo',
            'last_name' => 'Baggins',
        ];

        $table[] = [
            'id' => 2,
            'first_name' => 'Dinodas',
            'last_name' => 'Brandybuck',
        ];

        $table[] = [
            'id' => 3,
            'first_name' => 'Buffo',
            'last_name' => 'Boffin',
        ];

        $table[] = [
            'id' => 4,
            'first_name' => 'Bungo',
            'last_name' => 'Baggins',
        ];

        return new RowsOfFields($table);
    }
That’s all, we can now invoke the command and see their outputs
That’s all I can mention so far about how to implement Drush commands, sadly I couldn’t found a good guide on how to implement this commands, that’s why I wanted to write something to cover the most important things that I learned.
The primary source of learning are other commands, just go with your IDE and find all the implementations of the class DrushCommands, you’ll get the best samples on how to implement DrushCommands.
If you have comments or more things to add to this post, let me know and I’ll update it.
Here you have the complete Class that I wrote for all the examples.
More information and used content to write this post
https://www.specbee.com/blogs/writing-your-own-custom-drush-9-and-10-commands
https://docs.drush.org/en/9.x/
https://docs.drush.org/en/9.x/examples/
https://github.com/consolidation/annotated-command
https://www.droptica.com/blog/creating-custom-drush-9-commands-drupal-8/
https://symfony.com/doc/current/console.html
https://symfony.com/doc/current/console/style.html
Image credits http://wikis.fdi.ucm.es/SC/Uso_de_Drush
You should use drush.services.yml instead of your_module.services.yml.
Thank you Lev Ananikyan, I stuck on this for many hours because of this misleading